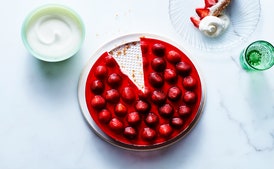
Retro Strawberries-and-Cream Pretzel Tart
['4 cups/140 g store-bought tiny pretzel twists', '1/2 cup plus 3 tbsp/155 g unsalted butter, melted', '1/2 cup/50 g firmly packed light brown sugar', '1 1/2 cups/360 ml cold heavy (whipping) cream', '1/2 cup plus 2 tbsp/125 g granulated sugar', '2 tsp pure vanilla extract', 'One 8-oz/225-g package cream cheese', '3/4 cup/180 ml water', 'One 3-oz/85-g package strawberry gelatin', 'About 2 quarts/910 g large fresh strawberries', 'tops trimmed']

Preheat the oven to 350°F/180°C/gas 4.
Put the pretzels into a resealable plastic bag and crush them with a rolling pin into pieces that are no larger than 1/4 in/6 mm. (Or pulse the pretzels in a food processor, if you prefer.) Pour the crushed pretzels and their crumbs into a medium bowl and stir in the butter and brown sugar. Press the crust mixture into the bottom of a 9-in/23-cm springform pan, covering the bottom of the pan evenly. Bake the crust until it is lightly toasted, 10 to 12 minutes. It will be soft and puffy when you first remove it from the oven, but will harden as it cools. Set the crust aside to cool completely.
Put the bowl of a stand mixer and the whip attachment in the freezer for 10 minutes.
Attach the bowl and the whisk attachment to the mixer, and pour in the cream. Begin whipping the cream on medium speed. When it starts to thicken, pour in 2 tbsp of the granulated sugar and the vanilla. Whip the cream mixture on medium speed until soft peaks form. (When you dip a spoon into the whipped cream and pull it out, the cream should form a peak that curls back onto itself.) Set aside 1 1/2 cups/360 ml of the whipped cream in a small bowl. Transfer the remaining whipped cream to a separate bowl, cover, and refrigerate; you will use it to top the tart later.
Put the remaining 1/2 cup/100 g of granulated sugar and the cream cheese in the bowl of the stand mixer. Using the paddle attachment, beat the sugar and cream cheese together on medium speed until creamy, about 2 minutes. Remove the bowl from the mixer, and stir the reserved 1 1/2 cups of whipped cream into the cream cheese mixture until it is homogenous. Spread the cream cheese filling evenly over the cooled crust. Be sure to completely cover the crust, spreading the filling to the edges of the pan. Use a damp paper towel to wipe down any specks of filling clinging to the sides of the pan or the edges of the tart will appear messy when the springform is removed. Refrigerate until chilled and set, 30 minutes.
Meanwhile, bring 1/2 cup/120 ml of the water to a boil over high heat. Put the gelatin powder in a medium heat-proof bowl and pour in the boiling water. Stir until the gelatin is completely dissolved. Stir in the remaining 1/4 cup/60 ml of cold water. Allow the gelatin to cool to room temperature.
While the gelatin cools, arrange the strawberries, cut-side down, over the cream cheese filling to cover the entire top of the tart. Start by lining the edge of the tart with a ring of strawberries and work your way to the center in a target pattern. The tips of the berries should be pointing straight up. Pour the gelatin over the strawberries and cream cheese layer, coating the tops of the strawberries in the gelatin as you pour. Refrigerate, covered, until the gelatin is completely set, at least 1 hour. (The tart can be refrigerated up to 1 day before serving.)
Remove the sides of the pan and transfer the tart (still on the springform base) to a serving platter. Gently rewhisk the reserved whipped cream for 10 to 15 seconds and pile it in the center of the tart, if you wish or pass at the table. Slice and serve immediately.
Attribution for Recipes (CC BY-SA 3.0):
The recipes displayed in this app have been crated using content available under the Creative Commons Attribution-ShareAlike 3.0 Unported (CC BY-SA 3.0) license. The recipes are based on the following dataset:
[Food Ingredients and Recipes Dataset with Images]
License: CC BY-SA 3.0
We would like to express our gratitude to the content creators who contributed to the dataset and shared their work under the CC BY-SA 3.0 license, allowing us to showcase and share these recipes with you.