
Stars Pappardelle
['1/2 batch dough (your choice of color, Green Pea Dough as shown)', 'Flour and semolina for dusting', '1/2 batch dough (your choice of color, Cacao Dough as shown)', 'Kosher salt', 'A star-shaped plunger cutter']
Choose which color of dough you want to be the background color for your stars and roll that dough to the third-thinnest setting on a pasta machine. Lightly dust a work surface with flour and place the pasta sheet on it. Using a star-shaped plunger cutter in any size you prefer, make star cutouts all over the sheet of pasta. I recommend spacing the star cutouts as close together as possible, because the sheet will get re-rolled and the stars will expand (doesn’t stars expanding blow your mind?). Cover this sheet with a kitchen towel. If you wish, save the tiny cutout stars to make pastina.
Roll the second dough on a pasta machine until it is the same size as the sheet with the star cutouts. Uncover the cutout pasta sheet and moisten it slightly with a kitchen brush dipped in water or a damp paper towel. Taking care to cover the cutout sheet precisely, lay the newly rolled sheet over the cutout sheet. Use a rolling pin to sandwich the two sheets together, rolling both lengthwise and crosswise.
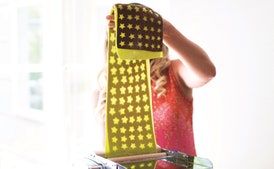
Once you are sure the two sheets are sufficiently pressed together, use a bench scraper to carefully turn the pasta sheet over, revealing the star pattern. You may be able to make nips, tucks, and small adjustments at this point if you notice any bunching up of the pattern. Dust with flour as necessary to prevent sticking.
Roll the sheet through the pasta machine again, starting on the widest setting. Reduce the rollers to the second-widest setting and roll the opposite end of the sheet through first this time. Alternating the sides of the sheet you put through the pasta machine will ensure that the stars don’t skew too much in one direction. Keep reducing the rollers until you’ve rolled the pasta sheet through the middle thickness on the pasta machine. Your stars will look wide! Don’t worry; we’re about to fix that.
Lay the pasta sheet flat on your work surface and cut the whole sheet crosswise in 5-inch widths (or wider, up to the width of your pasta machine rollers). The star pattern has so far been skewed only side to side, making really wide stars, so now we’ll run the 5-inch sheets crosswise through the pasta machine, to stretch the stars back toward symmetry.
Feed the 5-inch widths of pasta through the pasta machine crosswise this time, perpendicular to the direction you had been feeding them through initially. Watch the star pattern and stop sheeting at your desired thinness, depending on how stretched or skewed you want the stars. I suggest stopping at the second-or third-thinnest setting.
Working with one sheet at a time, cut lengthwise strips 3/4 to 1 inch wide. Hang the noodles to rest on a pasta drying rack, dowel, or the back of a chair and repeat the process with the remaining pasta sheets.
Let the pappardelle rest for 30 minutes hanging, then gently place them on a parchment-lined and semolina-dusted sheet pan. You can boil them at this point or wait up to 2 hours at room temperature before boiling. If you would like to cook them another day, after they are leathery to the touch and no longer sticky, store the pasta on a sheet pan covered with plastic wrap in the refrigerator for up to 3 days. Increase the cooking time by 1 minute if working with refrigerated pasta.
Boil in salted water for 2 minutes, drain, dress, and serve immediately.
Attribution for Recipes (CC BY-SA 3.0):
The recipes displayed in this app have been crated using content available under the Creative Commons Attribution-ShareAlike 3.0 Unported (CC BY-SA 3.0) license. The recipes are based on the following dataset:
[Food Ingredients and Recipes Dataset with Images]
License: CC BY-SA 3.0
We would like to express our gratitude to the content creators who contributed to the dataset and shared their work under the CC BY-SA 3.0 license, allowing us to showcase and share these recipes with you.